Dr Wood

Menu Share

You successfully shared the app

OK

Try Again

OK

Provide Feedback

Close
Tap below to rate this app out of 5 stars.
Review (optional)
Send
Thank you for rating this app - your feedback is important to us.
Close
Report this app for inappropriate content.
Send Report
Thank you for your report. This app will be reviewed for offensive content.
Close

Share With Contacts

Close
Tap the
icon at the top of the screen, then choose a method to share with your contacts.

Share With Contacts

Close
Tap the
icon at the bottom right of the screen, then choose share page to share with your contacts.

Copy Link

Close

https://drwood.shareableapps.com/

Tap and hold link above to copy to clipboard.

Delete Message?

Are you sure you want to delete this message?

Try Again

Try Again

Try Again

Dr Wood

Menu Share

You successfully shared the app

OK

Try Again

OK

Provide Feedback

Close
Tap below to rate this app out of 5 stars.
Review (optional)
Send
Thank you for rating this app - your feedback is important to us.
Close
Report this app for inappropriate content.
Send Report
Thank you for your report. This app will be reviewed for offensive content.
Close

Share With Contacts

Close
Tap the
icon at the top of the screen, then choose a method to share with your contacts.

Share With Contacts

Close
Tap the
icon at the bottom right of the screen, then choose share page to share with your contacts.

Copy Link

Close

https://drwood.shareableapps.com/

Tap and hold link above to copy to clipboard.

Delete Message?

Are you sure you want to delete this message?

Try Again

Try Again

Try Again

Dr Wood

Menu Share

Phone Number

Close

You successfully shared the app

OK

Try Again

OK

Provide Feedback

Close
Tap below to rate this app out of 5 stars.
Review (optional)
Send
Thank you for rating this app - your feedback is important to us.
Close
Report this app for inappropriate content.
Send Report
Thank you for your report. This app will be reviewed for offensive content.
Close

Share With Contacts

Close
Tap the
icon at the top of the screen, then choose a method to share with your contacts.

Share With Contacts

Close
Tap the
icon at the bottom right of the screen, then choose share page to share with your contacts.

Copy Link

Close

https://drwood.shareableapps.com/

Tap and hold link above to copy to clipboard.

Delete Message?

Are you sure you want to delete this message?

Dr Wood

Menu Share

Mater Orthopaedic Surgery


BACK

ORTHOPAEDIC DAY SURGERY

Admission Time

Our Pre-Admission staff will call you the business day prior to your admission to confirm your admission time and explain any clinical preparation. If you have not received a call or will be difficult to contact, please call +61 2 9923 7115 after 2.00pm the business day prior to your admission. (See our Patient Admission Guide )

You will need to fast for your anaesthetic so please follow the instructions given to you by the Pre-Admission staff.

The customer services team will also contact you the business day prior to your admission to explain any out of pocket expenses associated with your admission. We ask that you finalise these expenses on admission. If you do not have any out of pocket expenses you will not receive a call.

Preparing for day surgery

Please shower before you come to Mater Orthopaedic Day Surgery, use minimal make-up and, for comfort following your procedure, wear loose clothing. Do not wear nail polish or jewellery.

On arrival

Report to the Mater Orthopaedic Day Surgery Unit in the Mater Clinic (see FAQ). Access is from the lifts of the Mater Clinic car park or via the Mater Hospital.

What to bring

  • Original pre-admission forms, unless previously sent.
  • Any relevant doctors' letters scans and x-rays.
  • Health insurance fund card, if applicable.
  • Medicare card.
  • Health benefit card, if applicable.
  • Pensioner health card, if applicable.
  • Credit card or cheque to settle your account.
  • Books or magazines for reading prior to your procedure.

What not to bring

Do not bring cash, jewellery or valuables of any kind as the Mater Clinic cannot be responsible for any valuables or missing items.

Going home checklist

  • Make arrangements for someone to take you home. Patients must not drive, go by taxi alone or catch public transport after an anaesthetic.
  • Collect your x-rays and scans.
  • Collect follow-up information and your postoperative instructions.
  • Settle your account.
  • Pick up your medications from the pharmacy, if ordered by your doctor.

Checking out

When discharged please visit the orthopaedic day surgery reception to settle your account. We accept payment by cash, EFTPOS (check your daily limit), Visa, MasterCard, Amex and cheque, but not Diners Club. Following health fund payment of your claim, any balance owing will be debited to your credit card.

PREPARING FOR SURGERY

Paperwork

Please make sure you return your paperwork to the Mater Hospital prior your admission - fax, mail or drop off.

Medical History
Hospital Excess
Doctor's Certificate
Your medical history form is extremely important & must be completed & returned prior admission.
Be prepared to pay the hospital excess (or full fee if uninsured) before you go through surgery.
If you are going to require a doctor's certificate you must ask Dr Wood.

Admission Time

The day before procedure you will receive a phone call from one of the nursing staff with your admission time.

Your Regular Medications

During this phone call please advise the nurse of any medications you are currently on and they will let you know which ones to continue and which to cease.

Always cease anti-inflammatory medications 24 hours prior surgery.

Operative Site

Please notify the day surgery asap if you have any blemishes to the operative site (eg cuts, grazes, pimples). You may be required to take a photo and sned it to us so we can review it. We want to make sure your procedure is as safe as possible.

Fasting

You must be fasted (ie NO food, liquid - including water, gum, lollies etc) for a minimum of 6 hours prior your procedure.

Your procedure may be cancelled if you have not fasted prior surgery.

Medical History Information - IMPORTANT!

Once your surgery is booked, please contact the Mater Orthopeadic Surgery if you suffer from:

  • Diabetes
  • Heart Conditions such as: heart attacks, heart surgery, chest pain, heart murmurs (not inluding high blood pressure)
  • Sleep Apnoea
  • Latex Allergy
  • Epilepsy
  • Previous Blood Clots
  • Malignant Hyperthermia
  • Any condition that you are concerned about not mentioned above

FAQ's

Parking

Parking is available within the Mater Clinic. Access to the car park is from the main hospital entrance off Rocklands Road.

Secure Parking Rates

Duration
0-1 Hours
1-2 Hours
2-3 Hours
3-4 Hours
4-5 Hours
5-6 Hours
6+ Hours
Fees
$5.00
$7.50
$10.00
$12.50
$24.00
$25.00
$28.00

Patient Pick Up

A patient drop off / pick up zone is located outside the Mater Clinic. Drive in through the car park boom gate, go straight ahead, down the ramp and veer right. The first 15 minutes after entering the car park are free.

We recommend this method when picking up your loved one. Once in the Pick Up Area call the nurses +61 2 9923 7118 and we will walk/whellchair the patient directly to your car.

Info For Family and Friends

Mater Orthopaedic Surgery is a closed unit as we operate three theatres from within the unit. Therefore once you farewell your loved one at pre-op, you will be unable to to see them until they are officially discharged from recovery.

If you would like a Status Update you can ring the nurces in recovery +61 2 9923 7119

This is best done 5-6 hours after you say goodbye. As you can appreciate, we receive many calls from family members, however our main priority is the well-being of our patients, so please keep calls to a minimum.

How Long Will My Procedure Take?

The general turn around time for the day procedures is 6-8 hours from admission to discharge.

However, this will vary depending on the individual and their procedure. bear in mind, also, that everyone responds differently to anaesthetics and so recovery time does vary and can not be predicted. As this is day surgery, please keep the whole day free, just in case.

You Must Be Escorted Home

As you will have had a general anaesthetic our duty of care to you requires you to organise someone to escort you home and be with you overnight. Our protocol requires us to hand you over to your escort - we are unable to let you leave on your own.

Email Service

If you have questions pre or post procedure you can email mods@matersydney.com.au One of our nursing staff with reply within 24 hours.

YOUR THEATRE EXPERIENCE

Your Theatre Experience May Look Like This

Process
Check in at the front desk.
Nursing assessment interview.
Change into a hospital gown then a nurse will shave the operative area and paint it with sterilising solution.
Your Anaesthetic Nurse will check you in and then transfer you, in your bed, to the anaesthetic holding area.
Here your Anaesthetist will review your medical history, explain your anaesthetic and place a cannula in your arm which will be linked to rehydrating fluids.
Your surgeon will make contact with you prior to surgery and mark the operative site with a pen.
You will be taken into the theatre on your bed and asked to transfer onto the operating table.
The Anaesthetist will talk you through what they are doing, place the anaesthetic drug in the cannula and you will drift off to sleep.
You will be attached to our routine non-invasive monitors, which consist of a small probe on your finger, a blood pressure cuff on your arm and 3 ECG dots placed on your chest. The Anaethetic Nurse will then place an oxygen mask on your face.
Once you are asleep the Anaesthetist will place a small tube in your throat to assist with your breathing and will continue to monitor your progress for the entire procedure.
Your surgical procedure will take place during this time.
You will wake up in recovery where a nurse will be assessing your vital signs and providing you with any necessary pain relief.

INFO ON ANAESTHETICS

BRIEF INFORMATION ON ANAESTHETICS

What is Anaesthesia

A drug-induced depression of the Central Nervous System that results in a loss of response and perception to all external stimulation.

Components of Anaesthesia

  • Unconsciousness (lack of awareness of surrounding environment or stimulation)
  • Amnesia (impairment of memory)
  • Analgesia (absence of the sensation of pain)
  • Immobility (incapable of movement)

Types of anaesthetics provided at MODS

TYPE
General Anaesthetic (non-muscle relaxant)
General Anaesthetic (muscle relaxant)
Regional Anaesthetic
Local Anaesthetic
DESCRIPTION
Drug induced unconsciousness, amnesia and analgesia. Patient is not completely immobilised and breaths spontaneously
Drug induced unconsciousness, amnesia, analgesia and immobility. Patient is mechanically ventilated
Lack of sensation caused by application of local anaesthetic which interrupts the sensory nerve conductivity. Can be used alone or with general anaesthesia (for pain relief purposes)
Achieved by blocking of peripheral nerves, causing an insensitivity of pain at the area requiring surgery. Can be on its own, with light sedation or with general anaesthesia
EXAMPLES
  • Epidural
  • Spinal
  • Femoral Nerve Block (injection in nerves which refer to the leg)
  • Interscalene Block (injection into nerves that refer to the shoulder / upper arm)
  • Supraclavicular (injection into nerves that refer to the entire arm
Commonly placed in wound edges at conclusion of surgery to assist in pain relief

Anaesthetists

Each surgeon has a regular anaesthetist to work alongside them. You will be cared for and monitored by this anaesthetist throughout the entire procedure. They are all fully accredited anaesthetists.

Your anaesthetist will care for you by:

  • Reviewing your medical history before surgery in order to confirm you are fit for an anaesthetic
  • Inserting your cannula and administering all your necessary medications via that cannula
  • Being responsible for the induction of your anaesthetic
  • Managing your airway throughout the procedure
  • Monitoring your vital signs throughout the procedure (blood pressure, pulse, oxygen saturation etc)
  • Prescribing you pain relief in recovery and for the days following
  • Ensuring you are safe to be discharged

If you have any concerns your anaesthetist is available to be contacted before and after your surgery.

AFTER YOUR SURGERY

Waking Up

Waking up in recovery can sometimes be a bit disorientating and confusing.
However to help you prepare, you can expect:

  • An oxygen mask on your face
  • A wound dressing on the operative area that will be checked by your recovery nurse
  • To feel a bit shaky and have an itchy nose from the anaesthetic gases
  • (but these sensations will pass)
  • A sore throat from the breathing tube used in theatre (sometimes)

Pain

There may be some post-operative pain.
We use the pain scale (shown below) and rate surgical pain to be around the 6 mark.

  • If required, you will be provided with adequate pain relief in recovery.
  • You will be discharged home with medications from our pharmacy to help cover your pain for the days following.

Recovery stages for day only patients

Stage 1 Waking up from the anaesthetic and pain-relief

Stage 2 Further recovery/rest

  • Something to eat (sandwiches or biscuits) if surgeon permits
  • Something to drink (water, lemonade, apple juice, tea/coffee)
  • Some procedures require physio and a post-op x-ray

Stage 3 (final) Discharge information/instructions given

  • Post-op medications received – dispensed by pharmacy
  • Review by surgeon

At home

  • Follow the discharge instructions given by your surgeon
  • Refer to the FAQ if there are any gaps in the information
  • Phone the day surgery or surgeon's rooms if you have any further concerns

Services Provided

  • If your surgeon requests it, you are provided with a private physiotherapy session in our recovery area by a certified physiotherapist (+61 2 9460 3500 )
  • You will receive a personal consultation with one of our pharmacists who will explain your medications and answer any questions you may have.
Mater Admissions Guide
Day Surgery Admin Guide

You successfully shared the app

OK

Try Again

OK

Provide Feedback

Close
Tap below to rate this app out of 5 stars.
Review (optional)
Send
Thank you for rating this app - your feedback is important to us.
Close
Report this app for inappropriate content.
Send Report
Thank you for your report. This app will be reviewed for offensive content.
Close

Share With Contacts

Close
Tap the
icon at the top of the screen, then choose a method to share with your contacts.

Share With Contacts

Close
Tap the
icon at the bottom right of the screen, then choose share page to share with your contacts.

Copy Link

Close

https://drwood.shareableapps.com/

Tap and hold link above to copy to clipboard.

Delete Message?

Are you sure you want to delete this message?

Try Again

Try Again

Try Again

Dr Wood

Menu Share

Dr Wood - Info

Downloadable information for patients and healthcare professionals. Click image to view document.

Share File

Close

A link to will be emailed to the recipient.

will be added to a list of files, which you can access in the main menu, to send later.

already in list.

You successfully shared the app

OK

Try Again

OK

Provide Feedback

Close
Tap below to rate this app out of 5 stars.
Review (optional)
Send
Thank you for rating this app - your feedback is important to us.
Close
Report this app for inappropriate content.
Send Report
Thank you for your report. This app will be reviewed for offensive content.
Close

Share With Contacts

Close
Tap the
icon at the top of the screen, then choose a method to share with your contacts.

Share With Contacts

Close
Tap the
icon at the bottom right of the screen, then choose share page to share with your contacts.

Copy Link

Close

https://drwood.shareableapps.com/

Tap and hold link above to copy to clipboard.

Delete Message?

Are you sure you want to delete this message?

Dr Wood

Menu Share

List of files to share:

Email

You haven’t selected any files to be shared. Tap the Share button below documents to add them to this list. Return here to send them by email.

You successfully shared the app

OK

Try Again

OK

Provide Feedback

Close
Tap below to rate this app out of 5 stars.
Review (optional)
Send
Thank you for rating this app - your feedback is important to us.
Close
Report this app for inappropriate content.
Send Report
Thank you for your report. This app will be reviewed for offensive content.
Close

Share With Contacts

Close
Tap the
icon at the top of the screen, then choose a method to share with your contacts.

Share With Contacts

Close
Tap the
icon at the bottom right of the screen, then choose share page to share with your contacts.

Copy Link

Close

https://drwood.shareableapps.com/

Tap and hold link above to copy to clipboard.

Delete Message?

Are you sure you want to delete this message?

Dr Wood

Menu Share

You successfully shared the app

OK

Try Again

OK

Provide Feedback

Close
Tap below to rate this app out of 5 stars.
Review (optional)
Send
Thank you for rating this app - your feedback is important to us.
Close
Report this app for inappropriate content.
Send Report
Thank you for your report. This app will be reviewed for offensive content.
Close

Share With Contacts

Close
Tap the
icon at the top of the screen, then choose a method to share with your contacts.

Share With Contacts

Close
Tap the
icon at the bottom right of the screen, then choose share page to share with your contacts.

Copy Link

Close

https://drwood.shareableapps.com/

Tap and hold link above to copy to clipboard.

Delete Message?

Are you sure you want to delete this message?

Try Again

Try Again

Try Again

Dr Wood

Menu Share

ANIMATED ANATOMY OF THE KNEE

BACK

You successfully shared the app

OK

Try Again

OK

Provide Feedback

Close
Tap below to rate this app out of 5 stars.
Review (optional)
Send
Thank you for rating this app - your feedback is important to us.
Close
Report this app for inappropriate content.
Send Report
Thank you for your report. This app will be reviewed for offensive content.
Close

Share With Contacts

Close
Tap the
icon at the top of the screen, then choose a method to share with your contacts.

Share With Contacts

Close
Tap the
icon at the bottom right of the screen, then choose share page to share with your contacts.

Copy Link

Close

https://drwood.shareableapps.com/

Tap and hold link above to copy to clipboard.

Delete Message?

Are you sure you want to delete this message?

Try Again

Try Again

Try Again

Dr Wood

Menu Share
PRE & POST OPERATION

You successfully shared the app

OK

Try Again

OK

Provide Feedback

Close
Tap below to rate this app out of 5 stars.
Review (optional)
Send
Thank you for rating this app - your feedback is important to us.
Close
Report this app for inappropriate content.
Send Report
Thank you for your report. This app will be reviewed for offensive content.
Close

Share With Contacts

Close
Tap the
icon at the top of the screen, then choose a method to share with your contacts.

Share With Contacts

Close
Tap the
icon at the bottom right of the screen, then choose share page to share with your contacts.

Copy Link

Close

https://drwood.shareableapps.com/

Tap and hold link above to copy to clipboard.

Delete Message?

Are you sure you want to delete this message?

Try Again

Try Again

Try Again

Dr Wood

Menu Share

HOME > PRE & POST > ACL
BACK

ACL RECONSTRUCTION

The function of the anterior cruciate ligament is to control the amount of twisting which can take place between the top part of the knee (femur) and the bottom part of the knee (tibia). The anterior cruciate ligament (ACL) is found in the centre of the knee joint and is often injured by a sudden strong twisting motion, eg losing control of your skis or falling off a ladder.

If the ACL is ruptured and the knee twists the two parts of the knee joint clunk against each other, resulting in damage to the meniscus and/or articular cartilage. The damage may be very severe or mild but with time the damage accumulates and may lead to early arthritis.

The aim of ACL reconstruction is to improve your quality of life and to slow down the destruction of the knee joint.

Prior to Surgery

Please refer to the Pre Operative Information sheet.

Common Questions

How long do I have to fast before the operation?
Nothing to eat or drink for six hours before the operation.
What type of anaesthetic is used?
General anaesthetic.
How long will I need to stay in hospital after the operation?
Usually only for one day.
Will I have pain?
You will have pain, the degree varying for different patients. Do not be afraid of taking pain killers.
How soon can I drive?
You can drive as soon as you feel your knee is capable after two weeks.
Are there risks in the operation?
These are very rare but include infection, blood clots (DVTs),stiffness, re-rupture and a numb patch on the lateral aspect of the knee.
If I am taking medication what should I do?
It is very important that you inform all the people involved in your care, especially the Anaesthetist.

Surgical Procedure

An arthroscope is introduced into the joint and the joint is inspected. All visible damage is corrected. The area which used to be occupied by the anterior cruciate ligament is cleared and the bone surfaces are prepared to take the new ligament. The graft is usually a double stranded hamstring, ie using semi tendonosis and gracilis tendons. In some circumstances a mid third patella tendon graft is used and the bony plugs in the femur and the tibia are fixed with screws.

When a hamstring graft is taken, a tunnel is drilled in the tibia and in the femur and the graft placed as close to its original position as possible. It is fixed in the femur by an Endobutton and in the tibia, usually by a screw, and secured with a staple.

A patient's progress after surgery is significantly altered by other problems that may be encountered in the knee at the time of surgery. If there are any cartilage defects, then persistent pain and swelling is to be expected after surgery.

POST SURGERY

ANTERIOR CRUCIATE LIGAMENT RECONSTRUCTION

Reconstruction of the anterior cruciate ligament involves a day in hospital. Drains are removed approximately four hours post surgery. You will commence some basic range of movement exercises. Instructions will be given on how to use crutches and you will be taken for a walk.

You will be given a description of all the exercises and it is suggested that you continue to practise them at home every hour or so.

When You Leave Hospital

  • You will be unable to drive and you will need to organise transport home
  • A limited motion brace may be fitted to your knee
  • You will be on crutches - placing weight through your foot as feels comfortable
  • Dr Wood uses absorbable (clear) sutures in most cases
  • Formal physiotherapy will commence after the wounds are checked

Active Range of Motion Exercises

Active flexion and extension
Slide your heel up and down the bed to allow bending and straightening of the knee
Active flexion and extension lying on side
As per above but performed on your side with your affected leg down
Calf exercises
Bend your foot up and down from the ankle to maintain good circulation in the leg

Muscle Contraction Exercises

Static hamstring exercise
With one knee bent at about 30o, push the heel into the bed and hold for about 5 to 10 seconds. These may then be performed at varying angles of the knee
Co-contraction exercise
These involve contraction of the hamstrings and quadriceps muscle at the same time.

Think of trying to hold the leg as rigidly as possible which helps to protect the knee joint and in particular the graft.

With the knee bent over a pillow, push down into the pillow as hard as you can. Once you have achieved this and are holding your knee down, try and take the weight off your heel by lifting your foot off the bed. Hold for between 5 and 15 seconds

IT IS MOST IMPORTANT THAT THESE EXERCISES ARE CONTINUED ONCE YOU GET HOME, UNTIL YOU BEGIN FORMAL PHYSIOTHERAPY

Do's and Dont's

Do Exercise as often as possible - little but often is best, eg 5 minutes each hour

Do Keep the leg elevated when not walking

Do Stay on crutches until advised otherwise

Do Apply ice to the knee if you are concerned about any swelling

Do If braced, adjust the brace as necessary as it will tend to slip as the leg loses some bulk, ie loosen the straps, adjust the hinges of the brace so they are opposite your knee cap, then tighten the velcro straps

Do Ensure the leg does not get wet until the wounds are clean and dry

Don't Drink too much alcohol, especially in the first few weeks as the leg may become swollen and walking with crutches may be difficult.

It is Important That You

  • Contact the Doctor if the pain in your knee does not subside, if you have a temperature or if you find that you are sweating at night
  • Contact the Doctor if there is an increase in calf pain. Blood clots in the calf are uncommon but can occur

Walking with Crutches

Walking for the first time using crutches can be difficult

When attempting to walk with crutches, there are a few important points to keep in mind

  • Move your crutches first
  • Move your injured leg forward so that the foot rests lightly on the floor between the crutches
  • Bring your other leg through and place the foot comfortably in front of the crutches. Make sure that virtually all your weight is taken through your arms

When confronting stairs remember

When going up, take your weight through your crutches and move your unaffected leg onto the first step. Take your weight through this leg and then move your crutches and injured leg up onto the same step.

When going down, take your weight through your unaffected leg and move your crutches down onto the first step. Take your weight through the crutches and move the injured leg onto the step, followed by your unaffected leg.

IF YOU HAVE ANY WORRIES OR QUESTIONS, PLEASE DO NOT HESITATE TO CALL THE DOCTOR OR THE HOSPITAL

PRE & POST OP EXERCISE

Note: it is considered important that patients learn to manage the post-operative exercises before they have surgery. No lunges or squats during rehab.

Phase 1: Preoperative phase

Goals:
  • Diminish inflammation and swelling
  • Restore normal range of motion
  • Restore voluntary muscle control
Guidelines:
  • Active and passive knee extension to zero
  • Active and passive knee flexion to tolerance
  • Straight leg raises (3 way, flexion, abduction and adduction)
  • Closed kinetic chain exercises (step ups, mini squat holds and lunges)
  • Ice and elevation

Phase 2: (Week 0-1) / Post Surgery

Goals:
  • Reduce swelling
  • Improve patella mobility
  • Re-establish quadriceps control
  • Gait re-training with crutches
  • ROM exercises / Brace to be worn – usually set at 30-90 degrees - only if needed (Ligament Involvement)
Guidelines:
  • Commence weight bearing: gait training (with crutches) and VMO contraction – use of bio-feedback
  • Gentle hamstring static contractions: Eg; sitting, cross uninvolved leg's ankle behind involved leg, pull involved leg's heel backwards into the resistance of uninvolved leg's ankle. Hold for 5 sec, relax, repeat
  • Patella mobilisation
  • Soft tissue therapy for swelling control (quadriceps)
  • Standing weight shifts
  • Ankle pumps: progress to use of thera-band
  • Ice (cryotherapy pump) and elevation

Phase 3 (2-6 weeks)

Goals:
  • Increase passive extension ROM
  • Reduce swelling
  • Restore proprioceptive/neuromuscular control
  • Discontinue use of crutches and restore normal gait
  • ROM 0-130 degrees
Guidelines:
  • Straight leg raises (abd, add and flex)
  • Weight shift: increase to gentle single leg standing
  • Quarter squats: against wall, hold, lift uninvolved leg up
  • Double leg bridging: focus on pelvic stability and control – progress to single leg bridging
  • Double leg bridging with feet on chair: upper hamstring strength. May progress (from week 6) to eccentric hamstring strengthening as pain allows
  • Balance work: single leg standing on involved leg and tap foot of uninvolved leg out to side, in front and back
  • Stationary bike – low resistance, if pain and ROM allow
  • Open chain hamstring strength: gradual weight increase as tolerated

Phase 4: (6-12 weeks)

Goals:
  • Full ROM
  • Progression of squat strength form ¼ - ½
  • Improve proprioceptive and neuromuscular control
  • Increase hamstring strength
Guidelines:
  • Quarter squats
  • Lateral stepping
  • Commence jogging (on flat surface, no hills)
  • Stationary bike (low resistance to)
  • Stretching: Quadriceps, Gastrocs, Soleus and Hamstrings
  • Leg press: Gradually increase weight and progress to single leg (0-60degrees)
  • Backward running – stride backs
  • Bridging: Single leg bridging and progress to Swiss ball bridges double leg to single leg bridges

Phase 5: (12 weeks – 5 months)

Goals:
  • Incorporate more sport specific exercises
  • Incorporate agility and reaction time into proprioceptive work
  • Increase total leg strength
Guidelines:
  • Jumps: double leg, soft landing, ½ turns and repeat/
  • Hopping: front/back – sideways
  • Shuttle runs: eg zig-zag, side steps, grapevine, interval running with alternating speeds

Phase 6: (5 – 6months)

Goal: Return to sport

Guidelines:
  • Begin open chain leg extensions for quadriceps
  • Emphasis on plyometric strength
  • Proprioceptive skills: focusing on landing skills and use of wobble board (single leg)
  • Sport specific drills, training and cardiovascular fitness

You successfully shared the app

OK

Try Again

OK

Provide Feedback

Close
Tap below to rate this app out of 5 stars.
Review (optional)
Send
Thank you for rating this app - your feedback is important to us.
Close
Report this app for inappropriate content.
Send Report
Thank you for your report. This app will be reviewed for offensive content.
Close

Share With Contacts

Close
Tap the
icon at the top of the screen, then choose a method to share with your contacts.

Share With Contacts

Close
Tap the
icon at the bottom right of the screen, then choose share page to share with your contacts.

Copy Link

Close

https://drwood.shareableapps.com/

Tap and hold link above to copy to clipboard.

Delete Message?

Are you sure you want to delete this message?

Try Again

Try Again

Try Again

Dr Wood

Menu Share

PEP PROGRAM

This prevention program consists of a warm-up, stretching, strengthening, plyometrics, and sport specific agilities to address potential deficits in the strength and coordination of the stabilizing muscles around the knee joint. It is important to use proper technique during all of the exercises. The coaches and trainers need to emphasize correct posture, straight up and down jumps without excessive side-to-side movement, and reinforce soft landings.

This program should be completed 3 times a week. If you are using this program with athletes that are twelve or under, please perform the plyometrics over a visual line on the field or a flat 2" cone and land each jump with two feet. Do not perform single leg plyometrics with young individuals until they demonstrate substantial control. (see addendum) The field should be set up 10 minutes prior to the warm-up. This will allow for a smooth transition between the activities. A sample field set-up has been included in your packet.

This program should take approximately 15 - 20 minutes to complete. However, when you first begin the program, it may take slightly longer due to the fact that you must first become well acquainted with the program and the transitions. Along side each exercise you will notice a box with the approximate amount of time that should be spent on each activity. This will serve as a guideline to you in order to conduct your warm-up in a time efficient manner.

WARM UP

Warming up and cooling down are a critical part of a training program. The purpose of the warm-up section is to allow the athlete to prepare for activity. By warming up your muscles first, you greatly reduce the risk of injury.

A. Jog line to line (cone to cone):

Elapsed Time: 0 - .5 minute

Purpose: Allows the athletes to slowly prepare themselves for the training session while minimizing the risk for injury. Educate athletes on good running technique; keep the hip/knee/ankle in straight alignment without the knee caving in or the feet whipping out to the side.

Instruction: Complete a slow jog from near to far sideline

B. Shuttle Run (side to side)

Elapsed Time: .5 to 1 minute

Purpose: engage hip muscles (inner and outer thigh). This exercise will promote increased speed. Discourage inward caving of the knee joint.

Instruction: Start is an athletic stance with a slight bend at the knee. Leading with the right foot, sidestep pushing off with the left foot (back leg). When you drive off with the back leg, be sure the hip/knee/ankle are in a straight line. Switch sides at half field.

C. Backward Running

Elapsed Time: 1 – 1.5 minutes

Purpose: continued warm-up; engage hip extensors/hamstrings. Make sure the athlete lands on her toes. Be sure to watch for locking of the knee joint. As the athlete brings her foot back, make sure she maintains a slight bend to the knee.

Instruction: Run backwards from sideline to sideline. Land on your toes without extending the knee. Stay on your toes and keep the knees slightly bent at all times.

STRENGTHENING

This portion of the program focuses on increasing leg strength. This will lead to increased leg strength and a more stable knee joint. Technique is everything; close attention must be paid to the performance of these exercises in order to avoid injury.

A. Walking Lunges (1 minute)

Elapsed Time: 1.5 – 2.5 min

Purpose: Strengthen the thigh (quadriceps) muscle.

Instruction: Lunge forward leading with your right leg. Push off with your right leg and lunge forward with your left leg. Drop the back knee straight down. Make sure that your keep your front knee over your ankle. Control the motion and try to avoid you front knee from caving inward. If you can't see your toes on your leading leg, you are doing the exercise incorrectly.

B. Russian Hamstring (1 minute)

Elapsed Time: 2.5 –3.5 min

Purpose: Strengthen hamstrings muscles

Instruction: Kneel on the ground with hands at your side. Have a partner hold firmly at your ankles. With a straight back, lead forward leading with your hips. Your knee, hip and shoulder should be in a straight line as you lean toward the ground. Do not bend at the waist. You should feel the hamstrings in the back of your thigh working. Repeat the exercise for 30 seconds and switch with your partner.

C. Single Toe Raises (1 minute)

Elapsed Time: 3.5 – 4.5 min

Purpose: This exercise strengthens the calf muscle and increases balance.

Instruction: Stand up with your arms at your side. Bend the left knee up and maintain your balance. Slowly rise up on your right toes with good balance. You may hold your arms out ahead of you in order to help. Slowly repeat 30 times and switch to the other side. As you get stronger, you may need to add additional repetitions to this exercise to continue the strengthening effect of the exercise.

PLYOMETRICS

These exercises are explosive and help to build, power, strength and speed. The most important element when considering performance technique is the landing. It must be soft! When you land from a jump, you want to softly accept your weight on the balls of your feet slowly rolling back to the heel with a bent knee and a bent hip. These exercises are basic, however, it is critical to perform them correctly. Please begin these exercise using a flat cone (2 inches) or with a visual line on the field.

A. Lateral Hops over Cone (30 seconds)

Elapsed Time: 4.5 – 5min

Purpose: Increase power/strength emphasizing neuromuscular control

Instruction: Stand with a 2" cone to your left. Hop to the left over the cone softly landing on the balls of your feet land bending at the knee. Repeat this exercise hopping to the right. Progress to Single leg hops

B. Forward/Backward Hops over cone (30 sec)

Elapsed Time: 5 – 5.5 min

Purpose: Increase power/strength emphasizing neuromuscular control

Instruction: Hop over the cone softly landing on the balls of your feet and bending at the knee. Now, hop backwards over the ball using the same landing technique. Be careful not to snap your knee back to straighten it. You want to maintain a slight bend to the knee.

C. Single Leg hops over cone (30 seconds)

Elapsed Time: 5.5 – 6 min

Purpose: Increase power/strength emphasizing neuromuscular control.

Instruction: Hop over the cone landing on the ball of your foot bending at the knee. Now, hop backwards over the ball using the same landing technique. Be careful not to snap your knee back to straighten it. You want to maintain a slight bend to the knee. Now, stand on the left leg and repeat the exercise. Increase the number of repetitions as needed.

D. Vertical Jumps with headers (30 seconds)

Elapsed Time: 6 – 6.5 min

Purpose: Increase height of vertical jump.

Instruction: Stand forward with hands at your side. Slightly bend the knees and push off jumping straight up. Remember the proper landing technique; accept the weight on the ball of your foot with a slight bend to the knee.

E. Scissors Jump (30 seconds)

Elapsed Time: 6.5 – 7 min

Purpose: Increase power and strength of vertical jump.

Instruction: Lunge forward leading with your right leg. Keep your knee over your ankle. Now, push off with your right foot and propel your left leg forward into a lunge position. Be sure your knee does not cave in or out. It should be stable and directly over the ankle. Remember the proper landing technique; accept the weight on the ball of your foot with a slight bend to the knee. Repeat 20 times.

AGILITIES

A. Forward run with 3 step deceleration

Elapsed Time: 7 – 8 min

Purpose: Increase dynamic stability of the ankle/knee/hip complex

Instruction: Starting at the first cone, sprint forward to the second cone. As you approach the cone, use a 3 step quick stop to decelerate. Continue on to cone 2 using the same strategy to deceleration. Do not let your knee extend over your toe. Do not let you knee cave inward. This exercise is used to teach the athlete how to properly accelerate and decelerate while moving forward and the hip, buttock and hamstring musculature.

B. Lateral Diagonal runs (3 passes)

Elapsed Time: 8 – 9 min

Purpose: To encourage proper technique/stabilization of the hip and knee. This exercise will also deter a “knock knee" position from occurring – which is a dangerous position for the ACL.

Instruction: Face forward and laterally run to the first cone on the right. Pivot off the right foot and shuttle run to the second cone. Now pivot off the left leg and continue onto the third cone. Make sure that the outside leg does not cave in. Keep a slight bend to the knee and hip and make sure the knee stays over the ankle joint.

C. Bounding run (40 mtrs)

Elapsed Time: 9 – 10 min

Purpose: To increase hip flexion strength/increase power/speed

Instruction: Starting on the near sideline, run to the far side with knees up toward chest. Bring your knees up high. Land on the ball of your foot with a slight bend at the knee and a straight hip. Increase the distance as this exercise gets easier.

STRETCHING

It is important to incorporate a short warm-up prior to stretching. Never stretch a “cold muscle". By performing these stretches, you can improve and maintain your range of motion, reduce stiffness in your joints, reduce post- exercise soreness, reduce the risk of injury and improve your overall mobility and performance. Note: this portion of the program may be moved to the end of your training session. Do a warm-up such as brisk walking for five to 10 minutes before stretching. Gently stretch to a point of tension and hold. Hold the stretch for 30 seconds. Concentrate on lengthening the muscles you are stretching. Breathe normally.

A. Calf stretch (30 seconds x 2 reps)

Elapsed Time: 10 to 11 minutes

Purpose: stretch the calf muscle of the lower leg

Instruction: Stand leading with your right leg. Bend forward at the waist and place your hands on the ground (V formation). Keep your right knee slightly bent and your left leg straight. Make sure your left foot is flat on the ground. Do not bounce during the stretch. Hold for 30 seconds. Switch sides and repeat.

B. Quadricep stretch (30 seconds x 2 reps)

Elapsed Time: 11 to 12 minutes

Purpose: stretch the quadricep muscle of the front of the thigh

Instruction: Place your left hand on your partner's left shoulder. Reach back with your right hand and grab the front of your right ankle. Bring your heel to buttock. Make sure your knee is pointed down toward the ground. Keep your right leg close to your left. Don't allow knee to wing out to the side and do not bend at the waist. Hold for 30 seconds and switch sides

C. Figure Four Hamstring stretch (30 sec x 2 reps)

Elapsed Time: 12 – 13 min

Purpose: To stretch the hamstring muscles of the back of the thigh.

Instruction: Sit on the ground with your right leg extended out in front of you. Bend your left knee and rest the bottom of your foot on your right inner thigh. With a straight back, try to bring your chest toward your knee. Do not round your back. If you can, reach down toward your toes and pull them up toward your head. Do not bounce. Hold for 30 seconds and repeat with the other leg.

D. Inner Thigh Stretch (20 sec x 3 reps)

Elapsed Time: 13 – 14 min

Purpose: Elongate the muscles of the inner thigh (adductor group)

Instruction: Remain seated on the ground. Spread you legs evenly apart. Slowly lower yourself to the center with a straight back. You want to feel a stretch in the inner thigh. Now reach toward the right with the right arm. Bring your left arm overhead the stretch over to the right. Hold the stretch and repeat on the opposite side.

E. Hip Flexor Stretch – (30 sec x 2 reps)

Elapsed Time: 14 - 15 min

Purpose: Elongate the hip flexors of the front of the thigh.

Instruction: Lunge forward leading with your right leg. Drop your left knee down to the ground. Placing your hands on top of your right thigh, lean forward with your hips. The hips should be square with your shoulders. If possible, maintain your balance and lift back for the left ankle and pull your heel to your buttocks. Hold for 30 seconds and repeat on the other side.

ALTERNATIVE EXERCISES

We all know how imperative a cool down is. Please don't skip it. It allows the muscles that have been working hard throughout the training session to elongate and deters the onset of muscle soreness. Please emphasize the importance of adequate fluid intake (optimally water). The cool down should take approximately 10 minutes. It should begin with a slow jog to allow the heart rate to come down before stretching. This should be followed by some light strength training exercises. In addition to those basic stretches, we are offering some additional stretches to target 3 muscle groups that are often forgotten.

A. Bridging with Alternating Hip Flexion (1 minute)

Purpose: Strengthen outer hip muscles (Hip abductors, flexors) and buttocks

Instruction: Lie on the ground with your knees bent with feet on the ground. Raise your buttocks up off the ground and squeeze. Now, lift your right foot off the ground and make sure that your right hip does not dip down. Lower your right foot and now lift your left foot making sure your left hip does not dip down. Repeat 30 times on each side. As you get stronger, you will place your feet on top of a ball and repeat the exercise.

B. Abdominal Crunches (1 minute)

Purpose: Strengthen the abdominals (rectus abdominus, obliques)

Instruction: Lie on the ground with you knees bent. Place your hands behind your head with your elbows out wide. Support your neck lightly with your fingers. Take a deep breath in and slowly contract your abdominal muscles as you exhale. Repeat 30 times. Drop your legs off to the right side. Slowly crunch up with your elbows out wide. You should feel your oblique muscles working on the side of your waist. Repeat 30 times and switch to the other side.

C. Single and Double Knee to Chest (supine) (30 seconds x 2 reps)

Purpose: Elongate the low back muscles

Instruction: Lie on your back. Bring your right knee toward your chest and hug firmly. Keep your left leg out straight in front of you. You should feel a stretch along your low back and into your buttocks. Hold the stretch for 30 seconds and switch sides. Now bring both knees to chest. If you feel any pain in the low back, discontinue the stretch and inform your coach/trainer.

D. Figure Four Piriformis stretch- supine (1 minute)

Purpose: Elongate the rotators of the hip.

Instruction: Lie on your back and bend both of your knees. Fold your left ankle over your right knee. Place your hands behind your right thigh and pull your right knee to chest. You should feel a good stretch in the left gluteals region and the side of the thigh. Hold for 30 seconds and repeat on the other side. If you experience and low back pain with this stretch, slowly lower your legs down and let your coach/trainer know.

E. Seated Butterfly stretch - seated (30 sec x 2 reps)

Purpose: Elongate the inner thigh muscles (adductors).

Instruction: Sit up bringing your feet in so that the soles of your feet are touching. Gently place your elbows on your knees and slowly push down. You should feel a good stretch of the inner thigh. Hold this for 30 seconds and repeat 2 to 3 times.

ADDENDUM - YOUNGER ATHLETES

Younger Athletes (Under 12)

This program is safe to use for male and female athletes over the age of 12. You can safely utilize this program with younger athletes by making the modifications described below:

With the plyometric activities, have your younger athletes jump over a visual line on the field (midfield, end line, or sideline) or a flat 2" cone. The emphasis of this activity is the landing technique – not the height of the object that the athlete is jumping over.

In addition, the younger athletes should perform the plyometric activities with a two-legged landing. Again, the emphasis is on the landing and knee control (not allowing the knees to cave inward and bending the knees and the hips to accept the force of landing).

Repetitions are not emphasized in this program – time is. We would prefer to see 5 repetitions with perfect biomechanical technique completed in the allotted time period as opposed to doing ten repetitions haphazardly.

This program should be completed at the BEGINNING of the practice session. If you attempt to use this program after your training session, your athletes will be fatigued and their biomechanical technique will suffer. The element of fatigue can put your athletes at a higher risk for injury.

You successfully shared the app

OK

Try Again

OK

Provide Feedback

Close
Tap below to rate this app out of 5 stars.
Review (optional)
Send
Thank you for rating this app - your feedback is important to us.
Close
Report this app for inappropriate content.
Send Report
Thank you for your report. This app will be reviewed for offensive content.
Close

Share With Contacts

Close
Tap the
icon at the top of the screen, then choose a method to share with your contacts.

Share With Contacts

Close
Tap the
icon at the bottom right of the screen, then choose share page to share with your contacts.

Copy Link

Close

https://drwood.shareableapps.com/

Tap and hold link above to copy to clipboard.

Delete Message?

Are you sure you want to delete this message?

Try Again

Try Again

Try Again

Dr Wood

Menu Share

HOME > PRE & POST > ARTHROSCOPY
BACK

ARTHROSCOPIC SURGERY

The knee has the following structures:

  • Articular cartilage covers the bone ends and lets the knee move.
  • Menisci are two thick pads of tissue that form a rim inside the knee joint and stabilise the knee.
  • Ligaments hold the bones together, stabilising the joint.

    The knee joint functions like a hinge at the junction of two bones, the femur (thigh bone) and tibia (shin bone).
  • Meniscus - The knee's shock absorber.

Knees are a marvelous invention and without them you could not easily kick a ball, kneel down or climb into a car. The knee's meniscus is tissue designed to absorb the shock of weight and the motion of the body. Too much stress can injure this shock absorber. However, meniscal tears can be effectively treated with surgery and rehabilitation which means you can usually return to an active lifestyle.

A Torn Meniscus

A meniscal tear is commonly the result of a twist – a typical injury for someone like a netballer - or from repeated squatting. These tears create uneven surfaces that irritate the joint and may cause pain, swelling and a catching sensation. They often require surgery since they may not heal on their own. If not corrected, a meniscal tear can lead to more serious problems such as arthritis.

Undoing the Damage

A meniscal tear acts like dirt in the ball bearings of a machine. The longer the torn tissue is there the more irritation it causes and an early evaluation by an orthopaedic surgeon means earlier treatment and less damage to the joint. Meniscal surgery can repair or remove torn uneven cartilage and rehabilitation with a physiotherapist ensures the best chance of a rapid recovery.

Arthritis

Arthritis means an inflammation of a joint causing pain, swelling, stiffness, instability and often deformity. Severe arthritis interferes with activities and limits lifestyle.

What causes Arthritis in the Knee?

Osteoarthritis or Degenerative Joint Disease is the most common type of arthritis. Osteoarthritis is also known as “wear and tear arthritis", since the cartilage wears out. When cartilage wears away, bone rubs on bone causing severe pain and disability. The most frequent reason for osteoarthritis is genetic, since the durability of each individual's cartilage is based on genetics. If your parents have arthritis you may also get it.

Trauma can also lead to osteoarthritis. A heavy fall or blow to the knee can injure the joint. If the injury does not heal properly, extra force may be placed on the joint, which over time can cause the cartilage to wear away.

When the articular cartilage wears away and is damaged it will become irregular, fissured and fall off revealing the bone. The damage is classified as mild or Grade III when it is irregular or fissured. The damage is classified as severe or Grade IV when the bone is revealed.

The articular cartilage can be damaged or wear away. If this happens the underlying bones rub together, producing the pain and inflammation typical of arthritis.

The Reason for an Arthroscopy

Arthroscopic surgery is used to correct mechanical problems within the knee joint. Unfortunately once the structures in the joint have become damaged failure to correct the damage will result in further deterioration of the knee.

POST ARTHROSCOPY

An arthroscopy is a minimally invasive ('Key hole") operation to repair or investigate the integrity of a joint. Your surgeon examines the joint with an arthroscope (joint camera) while making repairs if needed through a small incision.

Phase 1: (0-2 weeks)

Goals:
  • Control swelling
  • Achieve normal gait and adequate weight bearing status
  • Dressing care
Guidelines:
  • Double leg to single leg calf raises. E.g: 4x12 slow and controlled
  • Heel slides in lying: Sliding heel up the bed/floor to buttock, hold stretch and slowly release. Repeat 15 times with 3 sec holds
  • Inner range quads: Rolled up towel/pillow under knee, lift heel off bed/floor, hold, lower and repeat. 5x10 times
  • Soft tissue therapy for swelling management
  • VMO exercises in sitting: Turn out foot, slightly extend the knee, lift leg from hip, hold, lower and repeat: 4 x 8 slow and controlled. Feeling a fatigue in the medial aspect of Quadriceps
  • Ice
  • Elevation

Phase 2: (2-4 weeks)

Goals:
  • Regain strength
  • Achieve normal joint range of motion
  • Guidelines:
  • Proprioceptive exercises: Eg, single leg balancing on a firm/stable surface to a soft/unstable surface. Progress to toe taps with uninvolved leg out to side, backwards and in front.
  • Stretching: Hamstrings and calf muscles
  • Stationary bike: low resistance to start
  • Bridging: Double leg to single leg, slow and controlled
  • Functional walking on varied surfaces

Phase 3: (4 weeks onwards)

Goals:
  • Return to function
Guidelines:
  • Slow progression to jogging. Eg: on grass, flat surface, interval style then progress to hills
  • Swimming
  • Stationary bike
  • Gym program: Eg Double leg press (0-60 degrees)
  • Dynamic Proprioception: focusing on landing stability, deceleration exercises, multi-directional strengthening

You successfully shared the app

OK

Try Again

OK

Provide Feedback

Close
Tap below to rate this app out of 5 stars.
Review (optional)
Send
Thank you for rating this app - your feedback is important to us.
Close
Report this app for inappropriate content.
Send Report
Thank you for your report. This app will be reviewed for offensive content.
Close

Share With Contacts

Close
Tap the
icon at the top of the screen, then choose a method to share with your contacts.

Share With Contacts

Close
Tap the
icon at the bottom right of the screen, then choose share page to share with your contacts.

Copy Link

Close

https://drwood.shareableapps.com/

Tap and hold link above to copy to clipboard.

Delete Message?

Are you sure you want to delete this message?

Try Again

Try Again

Try Again

Dr Wood

Menu Share

HOME > PRE & POST > COMPARTMENT DECOMPRESSION
BACK

COMPARTMENT SYNDROME

During exercise highly active muscles require large amounts of oxygen and glucose which require high blood flow down the arteries. This leads to “pumping up" of the muscles.

In some individuals the fascia surrounding the muscles is too tight to allow the muscle to swell during exercise. This leads to an increase in pressure inside the muscle compartment. When the pressure rises the veins become compressed because their walls are much softer.

If the pressure is not reduced, eventually muscles and nerves within the compartment are compromised, causing numbness and tingling in the feet. In severe cases, muscle death may occur, leading to permanent damage.

FASCIOTOMY

Fasciotomy is the splitting of the tight layer of fascia surrounding each of the involved compartments. This allows the muscles to swell during exercise allowing free flow in the blood vessels.

It usually consists of releasing either the anterior, lateral and posterior compartment or all three at the same time.

Antero-lateral release. Longitudinal incisions of about 5 cms each are made over the upper and lower aspect of the leg. The skin is undermined up and down the leg to expose the fascia of the anterior and lateral compartment. The fascia is then cut and split longitudinally and transversely with the excision of a small piece, allowing the compartment to expand.

Posterior release. A 6 cm incision is made at the mid point of the inner side of the tibia. The fascia is released from the border of the tibia and the superficial muscles freed off the back of the tibia and the deep fascia split longitudinally with a small piece excised.

Risks:
- damage to nerves and vessels
- wound infection

After:
- crutches for two weeks, followed by physiotherapy

COMPLETE REST WITH LEG ELEVATION

POST OPERATIVE INSTRUCTIONS

Diagnosis

Anterior compartment

Lateral compartment

Deep posterior compartment

Superior posterior compartment

Following discharge from hospital please see Dr Wood for your first post operative appointment to have your sutures checked 10 to 12 days after surgery.

To book your first appointment with Dr Wood on a Monday morning at the Mater Clinic please complete and submit the following:

Note Clinic Address:
3 Gillies St, Wollstonecraft 2065

Dr Wood uses absorbable / dissolving sutures in most cases.

On the day after surgery remove all bandages from your legs, leaving the plastic dressings. Apply elastic bandages from below knees to ankles.

The hospital will discharge you with pain relief medication which you may require for 48 to 72 hours. Contact your local doctor for further pain management if pain continues and is not relieved by elevation, rest, ice and Panadol.

After surgery you will require crutches to mobilise.

IT IS IMPORTANT THAT YOU

Contact Dr Wood or your local doctor if you notice increased calf pain. Blood clots are uncommon but can occur following surgery.

Contact Dr Wood or your local doctor if the pain in your legs does not subside, if you have a temperature or if you find that you are sweating at night.

Expect some swelling of feet in the few days following surgery.

High elevation of your legs is critical for good wound healing.

Physiotherapy - Dr Wood will advise at the time of your first post operative appointment when you can commence physiotherapy.

PHYSIOTHERAPY PROTOCOL

Phase 1 (0-2 weeks) Protection and mobility

Rehabilitation goals:
  • Protection of the post-surgical compartment
  • Minimize post-operative swelling
  • Positioning of limb (elevated)
  • Restore normal ankle and knee range of motion
  • Non-antalgic gait
Precautions:
  • Avoid any impact activity including running, jumping or hopping (6-8 weeks)
  • Avoid any activity that will increase swelling
Rehabilitation:
  • Active range of motion (AROM) of the ankle begins immediately to maintain tissue extensibility as they heal and present post-operative contractures. Progress: use of thera-band for controlled ankle dorsiflexion and plantarflexion
  • Supine straight leg raises: Eg: 4x15
  • Elevation, gentle compression and icing as needed
  • Gentle distal to proximal massage to assist venous return and swelling control

Phase 2: (2-4 weeks) Light strengthening

Rehabilitation goals
  • Lower extremity circumference within 1cm of uninvolved side
  • Minimize muscle atrophy and flexibility deficits in involved compartment
  • Full flexibility/mobility of gastrocnemius/ankle
  • Incision well healed
  • Single leg stance control
Precautions
  • Avoid eccentric loading
  • Avoid post-activity swelling by limiting prolonged weight-bearing acitivty as appropriate; if swelling occurs, manage with rest, ice, elevation and compression
Rehabilitation:
  • Gentle scar massage
  • Gentle Hamstring, Gastrocnemius and Soleus stretching
  • Nerve mobilisations in involved compartment
  • Proprioceptive exercises. Progress to single leg standing from a level/firm to soft/unstable surface
  • Gait drills: begin with forwards, sideways and backwards walking
  • May commence gentle stationary bike work (once wound has healed)
  • May commence gentle swimming or water walking once wound has FULLY healed

Phase 3 (4-6 weeks) progression of strengthening

Rehabilitation goals:
  • prevent post-operative recurrence of symptoms with all activity
  • tolerate 10-15min of continuous aerobic exercise without the onset of symptoms/pain
  • Normal 5/5 ankle strength and pain free
  • Proper lower extremity control and alignment
  • No pain with single leg functional movements
  • No residual swelling 12-24 hours following all physical activity
  • No pain 1-2 hours following activity (including impact exercises)
Precautions:
  • Avoid friction over scar
  • No running until 6-8 weeks post-operatively
  • Avoid pain with exertional activity
Rehabilitation:
  • Gently increase stretching and neural mobilisations
  • Lower extremity myofascial stretching and foam rolling
  • Progression of lower extremity closed-chain functional strengthening including mini lunges, step-backs and mini single squats
  • Single leg calf raises: slow and controlled eg 4x10
  • Progress gait drills
  • Initiate plyometric exercises (focus on lower extremity control and alignment at hip, knee and ankle). Example: at 6 weeks begin with 2 feet to 2 feet (jumping), progressing from 1 foot to the other foot (leaping) and then 1 foot to the same foot (hopping). Focus on landing technique and deceleration mechanics
  • May begin elliptical trainer as tolerated
  • Light jogging may commence at 6-8 weeks. Starting on a level surface, gentle interval style. Avoid hills and speed work. Consider progression of multi-planar activity for sport specificity

Phase 4: (8-12 weeks) Impact/Sport Training

Rehabilitation goals:
  • Proper dynamic neuromuscular control and alignment with eccentric and concentric multi-plane activities including impact for return to work/sports
  • Within 90% of pain free plantarflexion and dorsiflexion strength
Precautions:
  • Avoid pain with any exertional activity
  • Avoid post-activity swelling
Rehabilitation
  • Progressive strengthening exercises using higher stability and neuromuscular control with increased loads and speeds, along with combined movement patterns; begin with low velocity, single plane activities and progress to multi-plane high velocity
  • Begin with strides and slow jogging forward and backwards, side to side and diagonals
  • Integrate movements and positions into exercises that stimulate functional activities
  • Initiate sport specific training
  • Patient may return to sport/work if they have met the above criteria
  • Precautions: to reduce the risk of re-injury when returning to sport or high demand activities as appropriate; if collision/contact sport, may consider protective padding over area of scar tissue

You successfully shared the app

OK

Try Again

OK

Provide Feedback

Close
Tap below to rate this app out of 5 stars.
Review (optional)
Send
Thank you for rating this app - your feedback is important to us.
Close
Report this app for inappropriate content.
Send Report
Thank you for your report. This app will be reviewed for offensive content.
Close

Share With Contacts

Close
Tap the
icon at the top of the screen, then choose a method to share with your contacts.

Share With Contacts

Close
Tap the
icon at the bottom right of the screen, then choose share page to share with your contacts.

Copy Link

Close

https://drwood.shareableapps.com/

Tap and hold link above to copy to clipboard.

Delete Message?

Are you sure you want to delete this message?

Try Again

Try Again

Try Again

Dr Wood

Menu Share

HOME > PRE & POST > HIGH TIBIAL OSTEOTOMY
BACK

HIGH TIBIAL OSTEOTOMY

This operation is done to reduce pain by changing the pressure placed on the damaged joint surface (the arthritic part of the knee) and transferring the pressure to the more normal cartilage and bone of the other less affected side of the knee.

A wedge of bone is cut out below the knee, making the knee “knock-kneed" instead of “bow legged".

Reasons for a high tibial osteotomy

A high tibial osteotomy is usually performed for people who have osteoarthritis of the knee joint after many years of wear and tear or an old injury. It is usually performed on younger patients (30 to 60 years) who have osteoarthritis on the inside of their knee. This surgery is preferable to a total knee replacement when the patient is young and intending to return to an active lifestyle.

High tibial osteotomies have a 70% chance of giving good pain relief which means that just under one third of patients do not have the result from surgery they expect. It is therefore necessary to be very sure of the risks of surgery to make an informed decision before proceeding.

Surgery

Surgery is performed at the Mater Private Hospital and the length of stay is two to three days.

The potential complications of surgery are infection, deep vein thrombosis (blood clots), non union of bone, damage to lateral vessels and nerves and failure of the operation to relieve the patient's symptoms.

The surgery involves taking out a wedge of bone from below the knee and a metal plate and screws are applied to the bone to keep it stable. A drain is inserted and absorbable (dissolving) sutures are used to close the wound. The knee is wrapped in bandages and a brace applied.

Post Operative

The drain will usually be removed the day after surgery. The patient will require a brace and use crutches for six weeks.

The patient will see Dr Wood two weeks after discharge to check the wound and be given a referral to a physiotherapist to begin physiotherapy of the knee.

The patient should be able to return to work after three months (depending on the type of work the patient does). It takes six months to fully recover.

POST OPERATIVE INSTRUCTIONS

On discharge you will be wearing a brace for six weeks. Weight bearing should be with crutches, allowing only partial weight through your operated leg.

Please make an appointment to see Dr Wood to have your wound checked 10-14 days after surgery on a Monday morning at The Mater Clinic.

To book your appointment with Dr Wood at the Mater Clinic please complete and submit the following:

Note Clinic Address:
3 Gillies St, Wollstonecraft 2065

Dr Wood uses absorbable sutures in most cases.

This is your first post operative visit with Dr Wood, and physiotherapy of the knee may commence at this stage.

The next post operative appointment is six weeks after surgery, at which time an x-ray will be required to assess the healing of the osteotomy. The brace will be removed and weight bearing can be increased as tolerated.

Return to work is highly variable and dependent on your occupation.

IT IS IMPORTANT THAT YOU

  • Contact Dr Wood or your local doctor if you notice increased calf pain or swelling. Blood clots are uncommon but can occur following surgery.
  • Contact Dr Wood or your local doctor if the pain does not subside, if you have a temperature, or if you find that you are sweating at night.
  • POST OPERATION REHAB

    Phase 1 (0-4 weeks)

    Weight-bearing status:
    • (0-2 weeks) PWB 25% with crutches and brace locked in extension
    • (2-4 weeks) advanced to full weight bearing with crutches and brace locked in extension
    Brace:
    • Locked in extension (including sleeping) – remove for exercises
    ROM:
    • As tolerated – gentle passive ROM of 0-90 degrees flexion daily
    Guidelines:
    • Heel slides. Hold for at least 3 sec at flexion, release and repeat
    • Inner range quad sets
    • Ankle pumps in supine
    • Gastrocs and hamstring stretching
    • SLR with brace on
    • Plantarflexion/Dorsiflexion with theraband

    Phase 2 (4-6 weeks)

    Weight-bearing status:
    • As tolerated with crutches – begin to advance to normal gait pattern without crutches
    Brace:
    • Unlocked for ambulation and removed for sleeping
    ROM:
    • Reduce passive ROM exercises if 90 degrees flexion is easily achieved
    Guidelines:
    • SLR without brace if active full extension is easily achieved
    • Stationary bike with low resistance (if ROM allows)
    • Double leg to single leg calf raises

    Phase 3 (6-12 weeks)

    Weight- bearing status:
    • No restrictions/FWB
    • Normalised gait pattern
    Brace:
    • Discontinue use – per surgeon
    ROM:
    • Full and pain-free
    Guidelines:
    • Step ups and step downs – ensuring proper alignment, pelvic and glute control
    • Leg press: Low resistance, 0-60 degrees
    • Proprioceptive exercises: progress from firm/stable surface to soft/unstable surface
    • Hamstring curls: in standing, progressively add ankle weights
    • Stationary bike: increase resistance
    • Bridging: Double leg to single leg for glute and hamstring strength

    Phase 4 (3-9 months)

    Weight- bearing status:
    • Full
    Brace:
    • None
    ROM:
    • Full and pain-free
    Guidelines:
    • Progress closed chain exercises
    • Increase walking distance and pace (unstable surfaces, hills etc)
    • Commence swimming
    • Re-train for sport specific demands
    • Strides and deceleration exercises

    You successfully shared the app

    OK

    Try Again

    OK

    Provide Feedback

    Close
    Tap below to rate this app out of 5 stars.
    Review (optional)
    Send
    Thank you for rating this app - your feedback is important to us.
    Close
    Report this app for inappropriate content.
    Send Report
    Thank you for your report. This app will be reviewed for offensive content.
    Close

    Share With Contacts

    Close
    Tap the
    icon at the top of the screen, then choose a method to share with your contacts.

    Share With Contacts

    Close
    Tap the
    icon at the bottom right of the screen, then choose share page to share with your contacts.

    Copy Link

    Close

    https://drwood.shareableapps.com/

    Tap and hold link above to copy to clipboard.

    Delete Message?

    Are you sure you want to delete this message?

    Try Again

    Try Again

    Try Again

    Dr Wood

    Menu Share

    HOME > PRE & POST > PATELLOFEMORAL RECONSTRUCTION
    BACK

    PATELLOFEMORAL RECONSTRUCTION

    Tibial Tubercle Transfer

    A patellofemoral reconstruction or re-alignment is performed to correct recurrent instability, dislocation or “giving way" of the knee.

    The patella or knee cap slides up and down a shallow groove (the trochlear groove) and is kept on track by ligaments and muscles. Mal-tracking, instability or giving way occur when the ligaments and muscles are either weak, too tight, torn, stretched, etc. Sometimes the patella pops in and out of the groove during motion, which is known as subluxation.

    Patients are hospitalised for one to two nights and discharged on crutches (usually required for six weeks) and braced for approx. six weeks. The wound should be kept dry for ten to fourteen days when the patient should see Dr Wood for a check up consultation. A second consultation is required at six to eight weeks with an x-ray to check tibial tubercle union.

    Sedentary or office workers usually return to work two to four weeks after surgery. Labourers usually require twelve weeks off work.

    Possible Complications

    Infection, deep vein thrombosis or blood clots, numbness on the skin, recurrence

    Physiotherapy Schedule – guideline

    0 – 6 WEEKS
    Usually locked at 0°. Brace and static quadriceps rehabilitation Short VMO re-training. Touch weight bearing only.

    6 - 8 WEEKS
    Full weight bearing and static quadriceps Work range to limit. Continue with VMO work

    8 - 10 WEEKS
    Active quadriceps rehabilitation and increase range of motion to 90°

    10 - 12 WEEKS
    Go for full range of motion and full active quadriceps

    12 - 14 WEEKS
    Mini trampoline, bike riding, etc.

    After 14 weeks
    Full activities if quadriceps fully rehabilitated.

    POST OPERATION

    Phase 1 (0-6 weeks) Restricted mobilisation

    Goals:
    • Post-operative protection
    • Reduce swelling
    • Regain VMO activation
    • Normalise gait – progression to full weight bearing
    • Use of crutches for mobility - WBAT
    Restricted mobilisation:
    • a limited motion knee brace is used. The brace is locked into full extension from 0-10 days
    • then increased to 30degrees at 10 days
    • then 60 degrees at 3 weeks
    • and 90 degrees at 5 weeks
    • The brace is removed at 6 weeks
    Rehabilitation:
    • Regain VMO activation and control at allowable ranges. Eg: supine straight leg raise with foot out turned, lift, hold and lower. Repeat 3x6 times
    • Ice
    • Ankle pumps (plantarflexion and dorsiflexion and progress to use of thera-band for resistance)
    • Release of lateral structures (ITB and VL)
    • Tape if necessary for pain
    • Gait re-education
    • Swelling control
    • Calf raises: Start with double leg eg: 4x15 then to single leg calf raises on involved side
    • Side-lying leg lifts: Lift and lower leg (continuous manner) 4x20

    Phase 2 – (6-12 weeks) functional restoration

    Goals:
    • Regain control
    • Establish proximal gluteal and pelvic stability
    • Pain-free gait
    Rehabilitation:
    • Proprioceptive exercises: First on firm/stable surface then to soft/unstable surface. Single leg balancing
    • Use of biofeedback for adequate VMO contraction during steps and mini-squats and mini-lunges
    • Gluteus medius strengthening in standing. Eg: standing next to a wall/bench. Bend uninvolved leg and push horizontally into the wall (holding a folded towel into the wall). Stabilising an upright and symmetrical stance by activating
    • the involved leg's glute med – by resisting the push. Hold for 30sec and repeat 4 times
    • Glute and Hamstring strengthening: Double leg to single leg bridging
    • Lateral structure release as needed
    • Taping if necessary

    Phase 3 – (3 – 6 months)

    Goals:
    • Full range of motion
    • No effusion/swelling
    • Improve quadriceps, hip and core strength
    • Improve balance and proprioception
    Rehabilitation:
    • Gentle quadriceps, gluteal, hamstring, gastrocnemius and soleus stretching
    • Single leg press (start with a low weight, ensuring proper limb alignment)
    • Stationary bike cycling – progressive resistance as tolerated
    • Gentle swimming (no breaststroke kicking)
    • Progress to dynamic proprioceptive exercises
    • Progression to multi-planar agility drills with progressive increase in velocity and amplitude
    • Increase eccentric quadriceps work – use of decline board

    You successfully shared the app

    OK

    Try Again

    OK

    Provide Feedback

    Close
    Tap below to rate this app out of 5 stars.
    Review (optional)
    Send
    Thank you for rating this app - your feedback is important to us.
    Close
    Report this app for inappropriate content.
    Send Report
    Thank you for your report. This app will be reviewed for offensive content.
    Close

    Share With Contacts

    Close
    Tap the
    icon at the top of the screen, then choose a method to share with your contacts.

    Share With Contacts

    Close
    Tap the
    icon at the bottom right of the screen, then choose share page to share with your contacts.

    Copy Link

    Close

    https://drwood.shareableapps.com/

    Tap and hold link above to copy to clipboard.

    Delete Message?

    Are you sure you want to delete this message?

    Try Again

    Try Again

    Try Again

    Dr Wood

    Menu Share

    HOME > PRE & POST > PROXIMAL HAMSTRING REPAIR
    BACK

    HAMSTRING REATTACHMENT

    Patient information

    Proximal hamstring tendon avulsion is a rare and often difficult injury to treat. Depending on the type of avulsion you may experience immediate disabling pain and weakness, extensive bruising, swelling, an inability to run or walk and/or discomfort or pain with prolonged sitting.

    There are five types of avulsions:

    Type IBone avulsion
    This occurs when a portion of the ischial tuberosity (commonly called the bottom or sitting bone) breaks off with the tendon attached.

    Type 2Musculotendinous
    This occurs when the avulsion (tearing away) occurs between the hamstring muscle and the tendon.

    Type 3Incomplete
    An incomplete avulsion is when part of the tendon has torn away, but part remains attached to the ischial tuberosity.

    Type 4Complete (no retraction)
    A complete avulsion with no retraction occurs when the tendon has completely torn away from the ischial tuberosity but has not “coiled up" or descended further down the leg.

    Type 5Complete (with retraction)
    A complete avulsion with retraction occurs when the tendon has completely torn away and has “coiled up" or retracted to somewhere lower down the leg. (Type 5 avulsions more commonly involve post operative bracing).


    Surgery will involve inserting two or three “anchors" in the ischial tuberosity with sutures fixed to them. The sutures are passed through the tendon ends and the tendon is snugly re-approximated to the ischial tuberosity.

    The sciatic nerve sits very close to the hamstring tendon and scarring of the nerve may occur if the injury is left indefinitely. For this reason, Dr Wood will perform a “neurolysis" as part of the surgery. This involves identifying the sciatic nerve and carefully releasing any adhesions or scar tissue.

    You will be hospitalised and discharged on crutches (usually required for at least two weeks). Bracing (approx. 6 weeks) is occasionally necessary in chronic ruptures. Crutches need to be taken to the hospital.

    To perform the surgery, Dr Wood will make a 5-7 cm incision extending from the top of the thigh to the start of the buttock. After surgery, the wound will be covered with a waterproof bandage. You may shower but keep the bandage dry. You will be unable to sit on the wound for at least four to six weeks. A small foam block cushion is helpful to prop up your uninjured side to lessen pressure on the wound. Bar stools are also good because you can sit your good side on the edge of the stool and let your wounded side hang off. You will have to “hover" using your arms for support when going to the toilet.

    You should be partial weight bearing for the first several days. Use your crutches and allow your leg to rest. After several days you will be able to put light pressure on your leg but do not be tempted to overdo it. Using crutches for the first two weeks will allow the surgical site to heal more effectively. When you see Dr Wood two weeks post surgery he will advise when it is safe to cease using crutches. If you are braced you will require crutches until the brace is removed.

    The hospital physiotherapist will show you a simple non weight bearing range of motion exercise for your leg. Do not attempt anything more than that for the first two weeks.

    You will have post operative check ups with Dr Wood at approximately two weeks, six weeks, twelve weeks and twenty four weeks. The recovery process is gradual and Dr Wood may recommend physiotherapy between six and eight weeks after surgery. Do not have physiotherapy or attempt exercise without Dr Wood's clearance.

    Initially your leg will feel swollen and bruised and can also feel a bit tingly and numb around the wound site. Whilst the bruising will resolve fairly quickly, it is normal for swelling to come and go (dependent on your activity level) and the tingling/numb feeling to persist for several months. This is due to the many nerves affected by the surgery and should resolve over time. Ice is an excellent anti inflammatory and anti inflammatory medications can be taken for swelling and discomfort.

    Once you start moving around a bit more it is important not to overdo the use of your leg. Swelling and discomfort will indicate that you have done too much. Avoid situations that might cause you to fall, change direction quickly or take long strides, spend a lot of time on your feet, etc. You cannot expect to regain full function for up to six months, although you will be moving freely before then. Remember that it may look fine on the outside but you have undergone a major surgical procedure and patience is required to ensure optimal internal healing.

    Potential complications include infection, blood clots, damage to the sciatic nerve and an inability to re-attach the hamstring.

    You should be able to drive at six weeks post operatively.

    POST OPERATIVE INSTRUCTIONS

    Following discharge from hospital please see Dr Wood to have your sutures checked 10 to 12 days after surgery on a Monday morning at the Mater Clinic. This will be your first post operative appointment with Dr Wood. Please complete the following and submit to make your appointment:

    Please note address of the clinic:
    3 Gillies St, Wollstonecraft 2065.

    Dr Wood uses absorbable/dissolving sutures in most cases.

    Your wound should be kept dry until the appointment. You will be sent home with a water resistant dressing on your wound which can be replaced if necessary.

    The hospital will discharge you with pain relief medication which you may require for 48 to 72 hours. If the pain continues and is not relieved by rest and Panadol you should contact your local doctor for pain management.

    When mobilising use crutches and partial weight bear until review at your first appointment. If a brace has been applied do not remove or alter the settings.

    IT IS IMPORTANT THAT YOU

    Contact Dr Wood or your local doctor if you notice increased calf pain. Blood clots are uncommon but may occur following surgery.

    Contact Dr Wood or your local doctor if the pain increases, if you have a temperature or if you find that you are sweating at night.

    Expect some numbness down the back of your thigh.

    If you develop any weakness in your foot movements contact Dr Wood immediately.

    POST OPERATION REHAB

    Phase 1 – Acute Phase (0-2 weeks)

    Goals:
    • Reduce pain and swelling
    • Wound care
    • Restore standing posture and weight bearing
    • Maintain sciatic nerve mobility
    Guidelines:
    • Physiotherapy intervention is at a minimum
    • No muscle tension passive or active – ie hip flexion must only occur with simultaneous knee flexion
    • Gentle neural mobilisations (off-loading – not stretching)

    Phase 2 – Continued Healing and repair (2-6 weeks)

    Goals:
    • Scar management and protection
    • Restore normal gait pattern and full weight bearing
    • Pain free, non-resisted full hip AROM with the knee >90° flexion
    • Pain free, non-resisted full knee AROM with the hip at 0° in supine or side-lying
    • Dynamic core stability and gluteal strengthening
    • No scar massage until 4 weeks post-op. Use Micropore tape and other scar management treatments such as Cica Care or Kelocote)
    Guidelines:
    • Massage Hamstring belly plus trigger points (after 4 weeks)
    • Supine heel slides – hip and knee flexion to hip and knee extension: progression = gradually sit up as doing the heel slides
    • Supine crook lying single leg press against theraband: progression= supporting leg can hover or be raised whilst affected leg performs the leg press motion
    • Double leg calf raises: progression = single leg calf raises
    • Supine over the bed Knee extensions – open chain progressive resistance for quads strengthening and neural mobilisation. NB: Not sitting
    • Glute strengthening: standing hip hitching and standing to sidelying straight leg abduction

    Phase 3 – Continued Repair Phase (6-12 weeks)

    Goals:
    • Begin gravity-only resisted hamstring strengthening in neutral hip position
    • Start gentle proprioception/balance workout
    Guidelines:
    • Walking on flat ground as able but not as form of exercise. (Comfortable pace for 10 mins, progressing to 30min by week 12)
    • Exercise bike as tolerated
    • Double leg bridging in crook lying with feel on the floor. Progression a) decrease arm support from by side to across chest
    • b) add a box under feel then progress to legs on chair
    • Lumbar spine mobility with lower legs on a Swiss ball. Rolling the ball forward and back and side-to-side
    • Core stability progressions: Pilates reformer leg press (light springs)
    • Prone leg curls against gravity, no added weight resistance. Progression = standing leg curls – (No weights until 12 weeks)
    • ¼ squats with light hand-weights adding up to < ¼ of body weight
    • Standing theraband exercises (hip Abd/Ext)

    Phase 4 – Remodeling Stage (12-16 weeks)

    Goals:
    • Increase strength of hip/knee/ankle and kinetic chain
    • Full range of motion at hip and knee
    • Begin hamstring stretches
    • Begin strengthening Hamstring with added weight resistance
    • Progress proprioception/balance work
    Guidelines:
    • Fast walking (flat ground – no hills)
    • Continue standing theraband exercises (increase resistance)
    • Stretching: Straight leg raise or sitting knee extension to a gentle discomfort (2/10 VAS)
    • Hamstring strengthening with added resistance. Progression – prone – standing – machine leg curls
    • Swiss ball double leg bridges with core pre-activation
    • Single leg ¼ squats holding up to ¼ body weight
    • Progress glute strengthening: Supine theraband hamstring pull downs
    • Leg press: initially double leg and progress to single leg
    • Walk and balance on mini-tramp, foam balance
    • Pilates scooter and home scooter with thera-band

    Phase 5 – continued remodeling and strengthening stage (16-24 weeks)

    Goals:
    • 60-70% hamstring strength of involved side vs. non-involved side
    • Progress to eccentric hamstring strengthening
    • Jogging to 75% pace
    • Progress hamstring resisted weight training: Suggestions -
    Guidelines:
    • Fast walking up hills
    • Continue leg press > body weight
    • Progress hamstring resisted weight training: suggestions – double leg - single leg – 2 up concentric and 1 down eccentric. Gradually increase the speed
    • Hamstring curls in positions gradually increasing hip flexion
    • Increasing core stability exercises (advanced Pilates)
    • Swiss Ball bridges: Progression – Double leg on Swiss ball, pull heels towards buttock, slow and controlled. Maintain a stable pelvis and slowly decrease arm support
    • Balance on involved straight leg, bend over to touch the floor infront of you, then to the left, right and with alternate hands. Return to standing and repeat
    • Scooter: resistance on pilates reformer machine or with theraband
    • Plyometrics: jumping, hops, landing with ¼ - ½ turns
    • Sciatic neural mobilisation: Swinging leg and head nods
    • Light jogging on flat surface, starting with intervals of 100m with walking in between. Eg: 30m acceleration / 40m jog at 50% / 30m deceleration. Increase intensity as appropriate
    • Backwards striding. Increase speed gradually, focusing on deceleration control

    Phase 6 – Sports Specific phase (24 weeks plus)

    Goals:
    • return to sport
    • Running to sprinting
    • >80% hamstring strength of involved side vs non-involved side by 24 weeks
    • >85% hamstring strength of involved side vs non-involved side by 18-24 months
    Guidelines:
    • Sport specific drills
    • Plyometrics: alternate jump/split/scissor squats and lunges. Progression: add hand weights
    • Running drills: increase speed work
    • Straight leg dead lifts
    • Nordic Hamstring curls (eccentric then concentric and eccentric)

    You successfully shared the app

    OK

    Try Again

    OK

    Provide Feedback

    Close
    Tap below to rate this app out of 5 stars.
    Review (optional)
    Send
    Thank you for rating this app - your feedback is important to us.
    Close
    Report this app for inappropriate content.
    Send Report
    Thank you for your report. This app will be reviewed for offensive content.
    Close

    Share With Contacts

    Close
    Tap the
    icon at the top of the screen, then choose a method to share with your contacts.

    Share With Contacts

    Close
    Tap the
    icon at the bottom right of the screen, then choose share page to share with your contacts.

    Copy Link

    Close

    https://drwood.shareableapps.com/

    Tap and hold link above to copy to clipboard.

    Delete Message?

    Are you sure you want to delete this message?

    Try Again

    Try Again

    Try Again

    Dr Wood

    Menu Share

    HOME > PRE & POST > TOTAL KNEE REPLACEMENT
    BACK

    ARTHRITIS & YOUR KNEE

    Arthritis of the knee joint (usually osteoarthritis) is basically wear and tear of the joint. The knee can wear out because of age or because of a previous injury which accelerates wearing of the knee joint.

    Pain may have been experienced in one or both knees for some time, with limited movement when squatting or walking up and down stairs. There may also be a “crunching" of the knee which can be heard and felt when bending the knee.

    On examination of the knee, Dr Wood may request an X-ray to confirm the diagnosis by viewing the joint space, the gap between the thigh bone (femur) and shin bone (tibia). This gap is usually made up of meniscus and articular cartilage (similar to the shiny white gristle seen on the joint. Articular cartilage does not show up on X-ray and thus appears as a gap.

    If this articular cartilage is worn out by a previous injury or by wear and tear, the gap or joint space narrows, sometimes to the degree where bone rubs on bone and becomes very painful, causing crunching of the knee.

    The options for treating arthritis depend on a number of factors:

    • Age
    • Severity of arthritis
    • Weight
    • General health
    • Amount of pain – at rest and walking
    • Lifestyle

    These factors also help Dr Wood decide on the treatment of the arthritic knee - conservative treatment or surgery.

    Conservative treatment is usually chosen for younger people (30 to 60 years) when the disease is mild to moderate and little pain is experienced. This may include anti inflammatories, physiotherapy and a change in lifestyle ie avoiding all twisting sports or change of job. Some people can go on for many years being treated conservatively and some deteriorate rapidly to severe pain which may require surgery.

    Surgery may be recommended for older patients who have severe pain and arthritic changes on X-ray.

    For those people who are still young (40 to 60 years) a high tibial osteotomy may be necessary to alleviate the pain and grinding of the joint. This operation is 70% successful and thorough discussion with Dr Wood is necessary before proceeding to surgery.

    A successful high tibial osteotomy is especially good for those people who wish to return to an active lifestyle with little restriction on activities.

    For the more senior patients (60+ years) a total knee replacement may be necessary when pain in their knee is constant and prevents them from enjoying a good quality of life eg walking to the shops or playing nine holes of golf. If a patient has pain at rest and at night preventing sleep it is probably time for a total knee replacement.

    It is important to emphasise that a total knee replacement is only performed to relieve pain. It will not enable you to kneel, play netball, touch football, ballet or any twisting type activities or sports. It will help improve the quality of life so that you can walk to the shops or play golf.

    Sometimes a knee replacement will be performed on a younger person (40+ years) if their arthritic knee pain is severe and their quality of life is poor.

    This operation is 95% successful but with a recovery time of six months. Thorough discussion with Dr Wood involving the potential complications of this operation is necessary. Only when you are prepared to accept the risks of surgery should you consider having this performed.

    The chance of developing arthritis because of arthroscopic surgery for a torn meniscus?

    The chances of developing post traumatic arthritis is not because of the surgery but because of the injuries. The chance of arthritis is 100% after about 7 – 10 years, if the medial meniscus tore. The chance of arthritis is 100% after about 4 – 5 years, if the lateral meniscus tore.

    How bad the arthritis will be depends upon the patient's body physiology and the other damage done to the knee at the time of the injury when the meniscus tore. However, if the torn meniscus is allowed to remain in the knee the amount of arthritis will usually be greater, more painful, and will develop much faster than if the torn part of the meniscus is removed.

    TOTAL KNEE REPLACEMENT

    INFORMATION

    The time has come, possibly after many years of pain and discomfort, to replace your worn knee joint.

    It is important to understand a few things concerning your knee. The operation is performed for one reason only – pain relief. Afterwards you will not be able to kneel, squat, crawl, climb ladders, play tennis, jog or do any other twisting type sports. It will help you walk eighteen holes of golf without pain, or walk to your local shops.

    Recovery from your operation will take some time – five to seven days in hospital for a single joint replacement and then recuperation for a further week in a rehabilitation hospital. This depends on your post operative recovery and your situation at home - if you have someone who can help look after you.

    No two knees are the same and everyone recovers at a different rate for a number of different reasons (eg fitness, other affected joints and medical problems). If both knees are operated on then one will recover more quickly than the other.
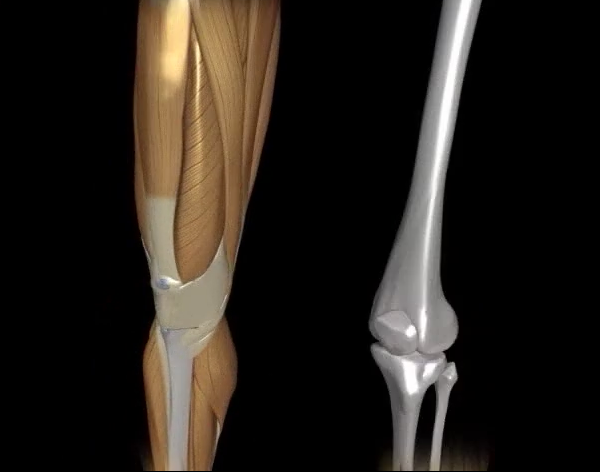
    THE KNEE

    How does the knee work?

    The knee joint functions like a hinge at the junction of two bones, the femur (thigh bone) and tibia (shin bone). The ends of the bones are covered with a thick cushion of hard white cartilage. There is only one coating of this cartilage in a lifetime and if it is damaged or worn away, the underlying bones rub together, producing the pain and inflammation typical of arthritis.

    What is arthritis?

    Arthritis is inflammation of a joint causing pain, swelling, stiffness, instability and often deformity. Severe arthritis interferes with activities and limits lifestyle.

    What causes arthritis in the knee?

    Osteoarthritis or Degenerative Joint Disease. The most common type of arthritis. Osteoarthritis is also known as “wear and tear arthritis" since the cartilage simply wears out. When cartilage wears away, bone rubs on bone causing severe pain and disability. The most frequent reason for osteoarthritis is genetic, since the durability of each individual's cartilage is based on genetics.

    Trauma can also lead to osteoarthritis. A bad fall or blow to the knee can injure the joint. If the injury does not heal properly, extra force may be placed on the joint, which over time can cause the cartilage to wear away.

    Inflammatory Arthritis. Swelling and heat (inflammation) of the joint lining causes a release of enzymes which soften and eventually destroy the cartilage. Rheumatoid arthritis, Lupus and psoriatic arthritis are examples.

    How can a doctor diagnose arthritis?

    Doctors diagnose arthritis with a medical history, physical examination and X-rays of the knee.

    What is a total knee replacement?

    When the cartilage has worn away, an artificial knee (called a prosthesis) can take its place. The surgery to implant the prosthesis is termed a total knee replacement. Only the surface of the joint is removed. The arthritic ends of the bones are shaved off and replaced with new metal and plastic surfaces. The knee replacement recreates some, but not all, knee functions.

    Who should have a total knee replacement?

    The most common reason for a total knee replacement is severe arthritic pain. Pain cannot be measured, and the degree of pain sufficient to warrant surgery should be decided by the patient and doctor together. Painful and arthritic knees often become unstable and untrustworthy, causing falls and other injuries. The patient's independence is compromised and the quality of their life will decrease.

    What are the benefits of total knee replacement?

    The goal of a total knee replacement is to relieve pain. It may also help to restore motion and straighten the limb.

    What is the short term outlook?

    Most patients can stand the second day after surgery and begin exercising that day. With the support of walkers or crutches, patients can walk with confidence, climb stairs and ride in a car by the time they leave hospital. Physiotherapy and motion exercises help recovery and should continue for months. Some swelling, aching and numbing are normal during this time. Most patients are up and about within six weeks.
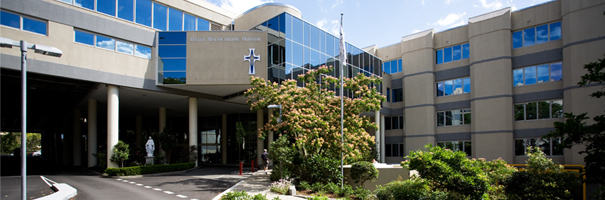
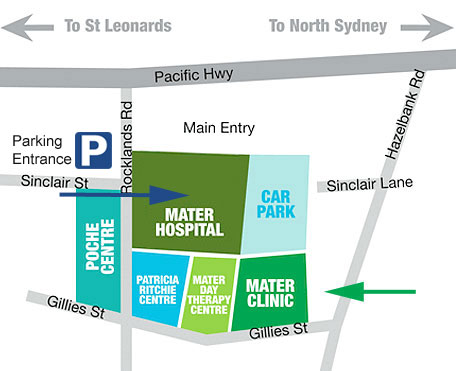
    Surgery

    Surgery will be performed at the Mater Private Hospital on a Monday afternoon. Hospital staff will admit and prepare you for surgery. The Anaesthetist will see you prior to surgery. Please advise the Anaesthetist of any medications you are taking.

    There are two parts to the surgery:

    Firstly: the femur is cut and a titanium femoral prosthesis is put in place.

    Secondly: the tibia is cut and a titanium tibial plate is put in place with four screws. A plastic articulating cartilage is placed inbetween the femur and tibia to act as a shock absorber, as well as a barrier between the metal. If the plastic wears out it is easily replaced.

    In some knees the patella (knee cap) will also be resurfaced.

    A drain will be in place for a couple of days and the wound closed with dissolving sutures or skin clips. Your leg will be wrapped with cotton wool and crepe bandages.

    If you had an epidural anaesthetic in your back this will help with pain relief post operatively. If not, recovery and ward staff will offer pain killers.

    You will commence physiotherapy (usually the day following surgery) to help you mobilise as soon as possible.

    Risks of surgery:

    The anaesthetic can cause problems. Discuss any concerns with your Anaesthetist.

    Blood clots (DVTs) can form following surgery. You will be given blood thinners in hospital and checked about the seventh day for blood clots with an ultrasound machine.

    Infection is the most difficult problem to treat and occurs in about 1% of patients. You will be given antibiotics in hospital.

    If you take Aspirin or Warfarin please advise your doctor as you will cease taking it about ten days prior to surgery.

    Post operatively

    Your recovery depends on you. Remember to take it easy and not overdo things during your immediate post operative period.

    The healing process for a total knee replacement can be very slow. It can take up to six months to fully recover – depending on your circumstances it may be more or less than this time.

    It is important not to compare yourself with others who have had this surgery as each individual's recovery is different.

    Knee replacements are painful for at least three months and some longer. You will never get full bend back or normal function.

    POST OPERATION

    Phase 1 (0-2 weeks)

    Goals:
    • Reduce swelling
    • Maintain a general ROM
    • Reduce muscular atrophy
    • Proper use of crutches – ability to navigate stairs and sit to stand
    Guidelines:
    • Ice/intermittent cryotherapy
    • Elevation of limb
    • Ankle exercises: Pumps (plantar/dorsiflexion)
    • Straight let raises: Lying supine, lifting, hold and lower leg
    • Inner range quags: Have a rolled up towel/pillow under knee, straighten knee and lift foot off bed, hold and repeat 4x15
    • Heel slides: slide heel up the bed, gently bending knee, hold and slide back down
    • Towel squeezes: have a rolled up towel under knee, push knee down into the towel, hold for 3 sec and release. Repeat 5x10 times. Place hand on thigh and ensure your quadriceps muscle tightens adequately each time
    • Crutches training

    Phase 2 (3-6 weeks)

    Goals:
    • Maintain functional gait status
    • Reduce swelling and effusion
    • Decreasing pain levels
    Guidelines:
    • Gentle calf and hamstring stretching
    • Increasing heel slides ROM in sitting, with a 2 sec hold at flexion
    • Patellar mobilisations
    • Soft tissue therapy (quadriceps, calf and hamstrings
    • Hamstring curls in prone
    • Bridging: Double leg
    • Mini squat holds: eg against wall, progress to slightly lifting uninvolved foot up off the floor for a 5 sec hold of body weight on the involved leg
    • Proprioception: Balance on involved leg on firm surface. Aim for 30 sec holds
    • Standing: Hip abduction and extension: progress to thera-band use

    Phase 3 (7-12 weeks)

    Goals:
    • Scar management
    • Reduction in swelling
    • Normalised gait
    Guidelines:
    • Progress mini squats
    • Bridging: single leg
    • Lateral stepping
    • Backwards strides: focusing on deceleration
    • Stationary bike: low resistance
    • Proprioception: unstable/soft surface

    Phase 4 (13+ weeks)

    Goals:
    • Gradual return to functional status
    • Scar management
    • Minimal to no pain in activity
    • No swelling
    Guidelines:
    • Increase walking, varying surfaces and hills etc
    • Stationary bike: progress resistance
    • Gentle gym work-outs: eg: rowing machine, gentle leg press 0-60degrees, etc.
    • Gradual return to sport
    • Regular stretching: gastrocs, soleus, hamstrings and quadriceps

    You successfully shared the app

    OK

    Try Again

    OK

    Provide Feedback

    Close
    Tap below to rate this app out of 5 stars.
    Review (optional)
    Send
    Thank you for rating this app - your feedback is important to us.
    Close
    Report this app for inappropriate content.
    Send Report
    Thank you for your report. This app will be reviewed for offensive content.
    Close

    Share With Contacts

    Close
    Tap the
    icon at the top of the screen, then choose a method to share with your contacts.

    Share With Contacts

    Close
    Tap the
    icon at the bottom right of the screen, then choose share page to share with your contacts.

    Copy Link

    Close

    https://drwood.shareableapps.com/

    Tap and hold link above to copy to clipboard.

    Delete Message?

    Are you sure you want to delete this message?

    Try Again

    Try Again

    Try Again

    Dr Wood

    Menu Share

    You successfully shared the app

    OK

    Try Again

    OK

    Provide Feedback

    Close
    Tap below to rate this app out of 5 stars.
    Review (optional)
    Send
    Thank you for rating this app - your feedback is important to us.
    Close
    Report this app for inappropriate content.
    Send Report
    Thank you for your report. This app will be reviewed for offensive content.
    Close

    Share With Contacts

    Close
    Tap the
    icon at the top of the screen, then choose a method to share with your contacts.

    Share With Contacts

    Close
    Tap the
    icon at the bottom right of the screen, then choose share page to share with your contacts.

    Copy Link

    Close

    https://drwood.shareableapps.com/

    Tap and hold link above to copy to clipboard.

    Delete Message?

    Are you sure you want to delete this message?

    Try Again

    Try Again

    Try Again

    Dr Wood

    Dr Wood

    Shareable App

    App category: Healthcare & Medical
    Updated: April 2, 2016
    App Publisher: Dr Wood
    Compatible with: iOS 6+, Android 4+, Blackberry 10+ and Windows Phone 8+.
    Legals: Terms of use

    You successfully shared the app

    OK

    Try Again

    Menu

    You successfully shared the app

    OK

    Try Again

    OK

    Provide Feedback

    Close
    Tap below to rate this app out of 5 stars.
    Review (optional)
    Send
    Thank you for rating this app - your feedback is important to us.
    Close
    Report this app for inappropriate content.
    Send Report
    Thank you for your report. This app will be reviewed for offensive content.
    Close

    Share With Contacts

    Close
    Tap the
    icon at the top of the screen, then choose a method to share with your contacts.

    Share With Contacts

    Close
    Tap the
    icon at the bottom right of the screen, then choose share page to share with your contacts.

    Copy Link

    Close

    https://drwood.shareableapps.com/

    Tap and hold link above to copy to clipboard.

    Delete Message?

    Are you sure you want to delete this message?

    Try Again

    Try Again

    Try Again